Installation
Pre-requisites
Sklearn version must be > 0.19, otherwise there will be several blocking issues.
to upgrade scikit-learn:
On conda:
conda update conda

conda update scikit-learn
If you do not use conda, update with pip:
pip install scikit-learn --update
Warning: if you use conda, you must absolutely update sklearn with conda
Additionally, you must also install category_encoders and imbalanced-learn:
pip install category_encoders
pip install imbalanced-learn
Optionally, you may install the following models:
- LightGBM (highly recommended, because it is very quick and efficient):
pip install lightgbm
- Xgboost (highly recommended, because it is also state of the art):
See Xgboost documentation for installation
- Catboost:
pip install catboost
- keras with theano or tensorflow:
See keras, theano or tensorflow documentation for installation
Installation
Download the module from github and extract the zip file in a folder (by default automlk-master)
Install as:
cd automlk-master

python setup.py install
Basic installation
The simplest installation runs on a single machine, with at least the following processes: 1. the web app 2. the controller, grapher and text worker 3. a single worker
These 3 components are run in a console (Windows) or Terminal (Linux).
The basic installation will use a data folder on the same machine. By default, the data folder should be created at one level upper the automlk-master folder.
For example, let’s assume that autoMLk is created in the $HOME (Linux) level or Documents (windows):
- home
- pierre
- automlk-master
- automlk
- run
- web
- data
If you want to use a data folder in another location, you can define this in the config screen.
To run the web app:
cd automlk-master/web

python run.py
This will launch the web app, which can be accessed from a web browser, at the following address:
http://localhost:5001
From the web app, you can now define the set-up and then import the example of datasets.
You can launch the search in a dataset simply by clicking on the start/pause button in the home screen, and view the results through with the web interface. The search will continue automatically until the search is completed.
To run the controller, grapher et text manager:
cd automlk-master/run

python run_controller.py
python run_grapher.py
python run_worker_text.py
To run the workers on one or multiple machines:
On Linux:
cd automlk-master/run

sh worker.sh
On Windows:
cd automlk-master/run

worker
Note: This will run the python module ru_worker.py in an infinite loop, in order to catch the potential crashes from the worker.
Advanced configuration
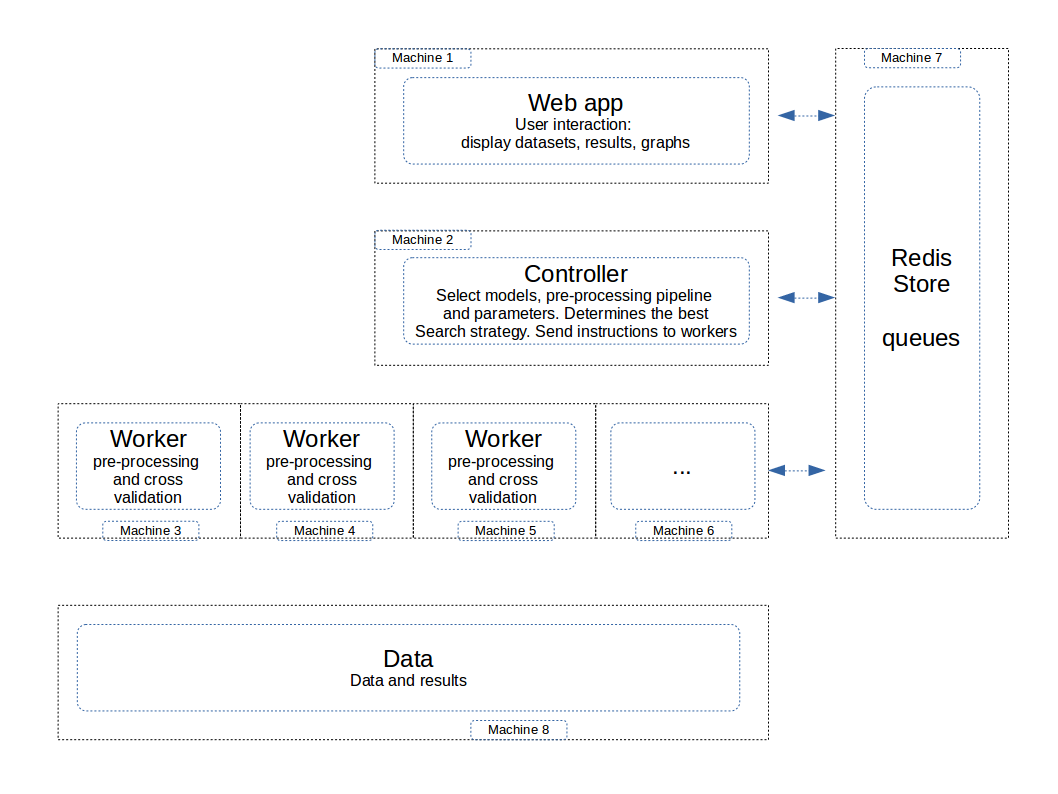
independent components of the architecture
Data server
The data are stored in a specific folder. In the default configuration, it is supposed to be on the same machine, and in the folder data. You may specify a different machine and location. The configuration is stored in the config.json file
{“data”: “../../data”, “theme”: “bootswatch/3.3.7/darkly”, “store”: “file”, “store_url”: “192.168.0.18”}
The data folder must be accessible by all the machines with the following components: - web server - controller - worker
Web server
The web server should be on a separate machine than the workers, in order to guarantee the response times for the user inferface.
If you want to use a data folder in another location, you can define this in the config screen.
To run the web app:
cd automlk-master/web

python run.py
This will launch the web app, which can be accessed from a web browser, at the following address:
http://localhost:5001
From the web app, you can now define the set-up and then import the example of datasets.
You can launch the search in a dataset simply by clicking on the start/pause button in the home screen, and view the results through with the web interface. The search will continue automatically until the search is completed.
Store
The store by default is implemented using the file system, in he folder data/store, where ‘data’ is the folder defined for data storage.
The recommended mode is Redis, with the following advantages: - faster user experience of the web app, thanks to the in-memory storage of Redis which is very fast - more robust queuing and communication mecanism between controller and workers.
It is then highly recommended to use Redis for the store, when you have a cluster of multiple workers.
The installation of Redis is simple on Linux machines, and there is also a windows version available. Please see the Redis documentation directly to install and configure your Redis store.
The Redis server can be installed on the same machine as the web server.
Controller, grapher and text worker
The controller can be executed on the machine of the web server. It can also be installed if required on a specific machine.
It must be run in a standalone process, and we recommend that you install this process in a service (windows server) or a permanent process (Linux).
To run the controller:
cd automlk-master/run

python run_controller.py
python run_grapher.py
python run_worker_text.py
Workers
The workers are the components in the architecture with the most significant impact: the speed of search is directly proportional to the number of workers. We recommend to run at least 4 workers, and with multiple datasets to be searched simultaneously, a cluster of 10 to 20 machines should deliver great performance and speed.
To run the worker:
On Linux:
cd automlk-master/run

sh worker.sh
On Windows:
cd automlk-master/run

worker
Note: This will run the python module ru_worker.py in an infinite loop, in order to catch the potential crashes from the worker.